Phone number based OTP authentication has become one of the most common sign-in experiences today. Instead of managing passwords, users can simply enter their mobile number, verify an OTP, and access the application.
Amazon Cognito now provides native support for passwordless authentication through its choice-based sign-in capabilities. In this guide, you'll learn how to configure Cognito for SMS OTP authentication, enable passwordless sign-in, and understand the authentication flow required to implement it in your own applications.
This guide uses a custom authentication flow with the AWS SDK rather than Cognito's Managed Login pages.
Step 1. Create a new Cognito User Pool and App Client
Select any Application type except Machine-to-machine application.
Provide a name for your application (App Client), and select Phone number under Sign-in identifiers.
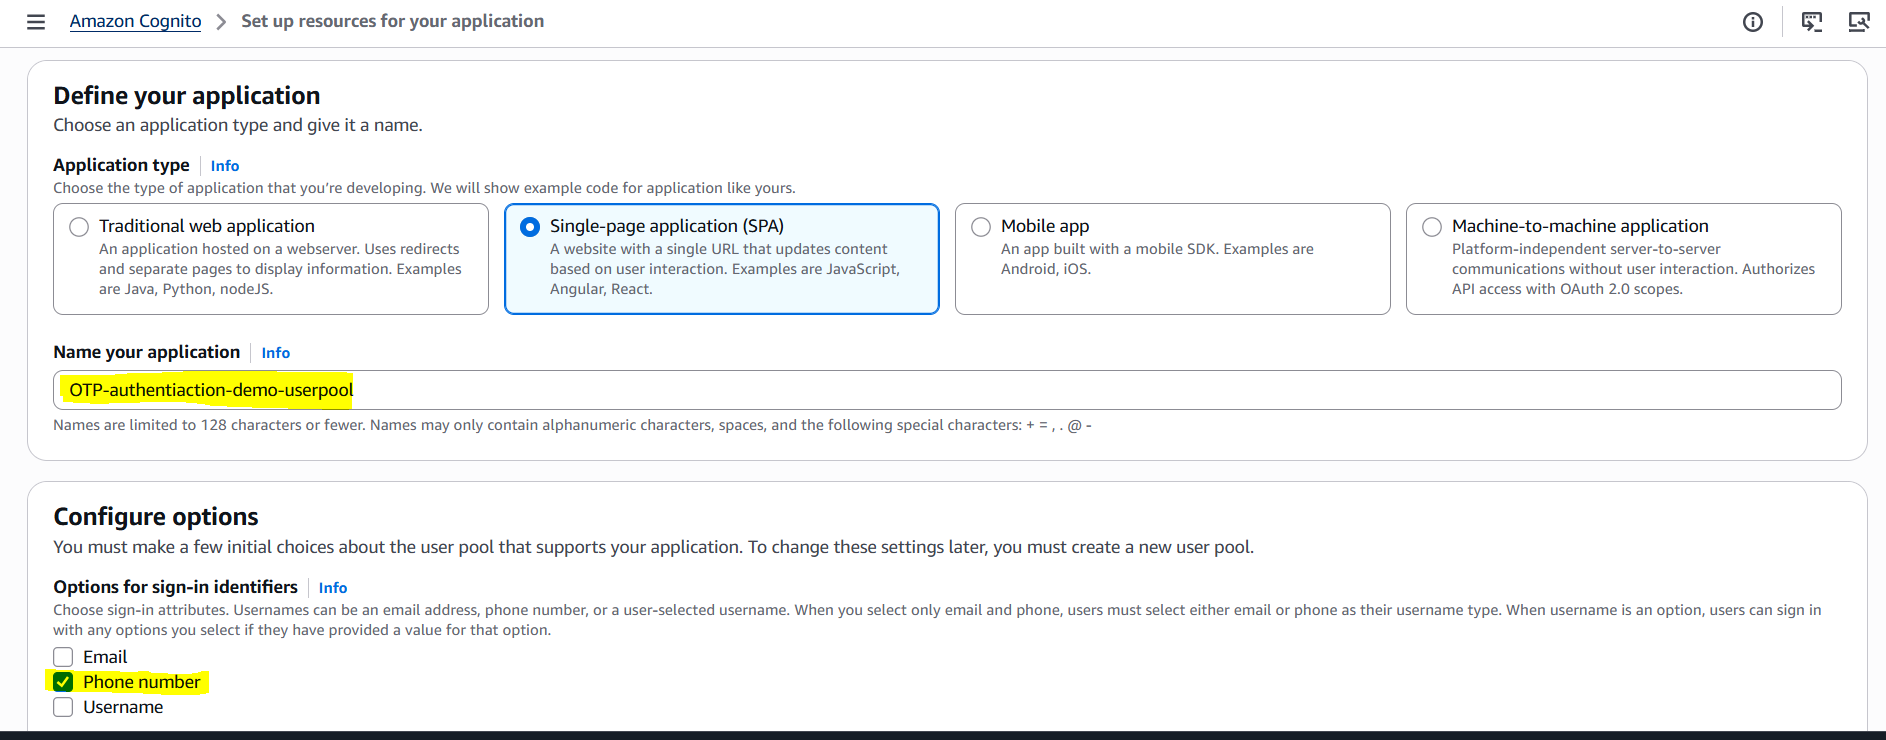
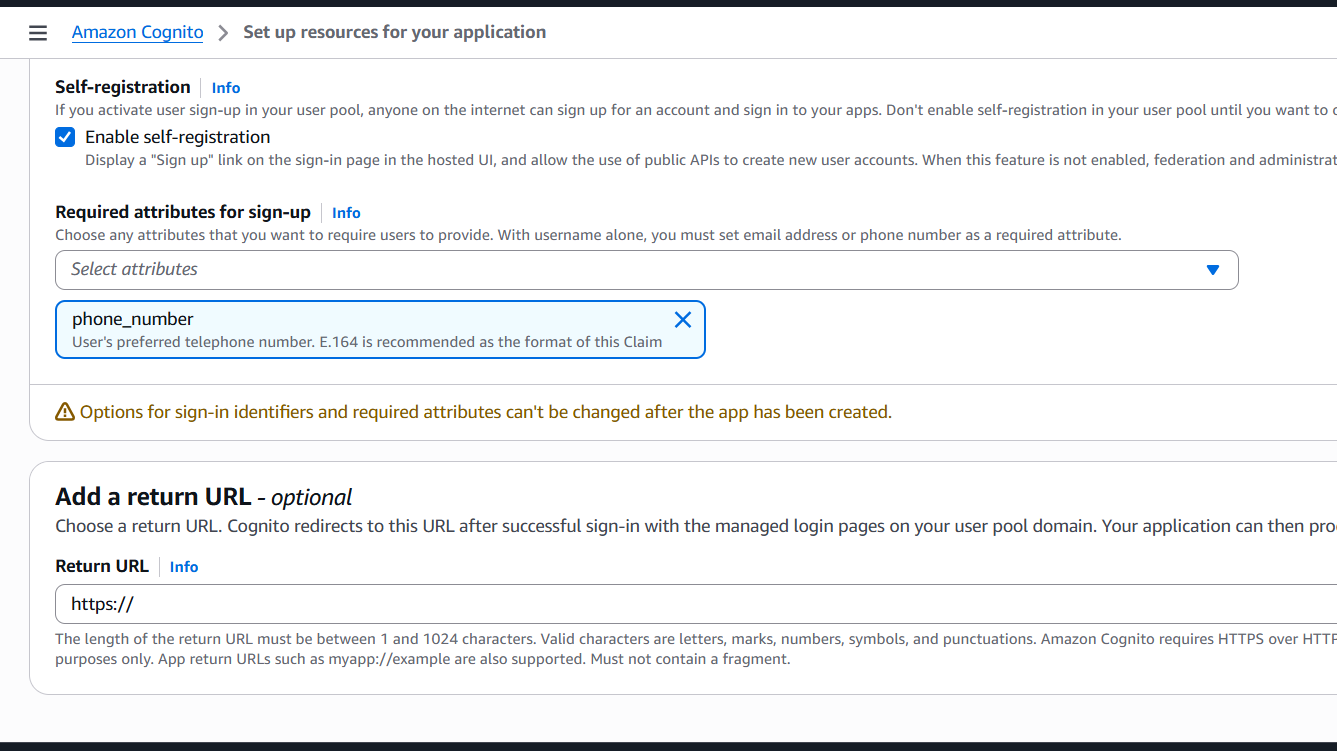
Enable Self-registration, then select Phone number as the only sign-up attribute. Finally, click Create user directory.
Step 2. Authentication Flows in Amazon Cognito
💡 Good to Know
You don't need to master every Cognito authentication flow to implement passwordless sign-in. The key takeaway from this section is understanding the challenge-response authentication loop, as the SMS OTP flow introduced later follows the same pattern.
The authentication flow in Amazon Cognito is the process where your application verifies user identity and receives JSON Web Tokens (JWTs).
Cognito supports several authentication flows, including:
USER_AUTHUSER_SRP_AUTHADMIN_USER_PASSWORD_AUTHUSER_PASSWORD_AUTHCUSTOM_AUTHREFRESH_TOKEN_AUTH
Important: Authentication flows are available at the User Pool level, but they must be explicitly enabled on the App Client before they can be used.
Sign-Up Flow
The sign-up process is fairly straightforward:
- Create the user by calling either
SignUp(self-registration) orAdminCreateUser(administrator-driven registration). - If Cognito-assisted verification is enabled, the user confirms their account using a verification code via
ConfirmSignUp. - Once the verification succeeds, the user status changes to
CONFIRMEDand they can sign in.
Sign-In Flow
The sign-in process follows a challenge-response pattern:
- Start authentication by calling
InitiateAuth(orAdminInitiateAuth) and specify the desiredAuthFlow. - Cognito may immediately authenticate the user or return a challenge that requires additional verification.
- If a challenge is returned, Cognito also provides a temporary
Sessiontoken that tracks the authentication state. - The application responds to the challenge by calling
RespondToAuthChallengeand supplying the required user input. - This challenge-response cycle (authentication loop) continues until authentication succeeds and Cognito returns JWT tokens.
Understanding this authentication loop is important because the passwordless SMS OTP flow introduced later in this guide follows the exact same pattern.
Generic Cognito Authentication Flow Example
💡 This example demonstrates Cognito's general challenge-response authentication pattern and is intended for learning purposes. The passwordless SMS OTP implementation used in this guide is provided later in Step 8.
This sample exposes separate endpoints for registration and authentication. It also illustrates how Cognito uses the Session token to maintain authentication state across multiple requests whenever additional verification is required.
Sign-Up Flow
The sign-up flow consists of:
POST /signup- Creates a new user account.POST /confirm-signup- Confirms the account using the verification code sent by Cognito.
Sign-In Flow
The sign-in flow consists of:
POST /login- Initiates authentication.POST /verify-challenge- Responds to Cognito challenges and completes authentication.
public class AuthController : ControllerBase
{
    ...

    #region SIGN UP FLOW

    [HttpPost("signup")]
    public async Task<IActionResult> SignUp(...)
    {
        ...
    }

    [HttpPost("confirm-signup")]
    public async Task<IActionResult> ConfirmSignUp(...)
    {
        ...
    }

    #endregion

    #region SIGN IN FLOW

    [HttpPost("login")]
    public async Task<IActionResult> InitiateLogin(...)
    {
        ...
    }

    [HttpPost("verify-challenge")]
    public async Task<IActionResult> VerifyChallenge(...)
    {
        ...
    }

    #endregion
}
Complete Controller
For convenience, the complete controller implementation is shown below.
using Microsoft.AspNetCore.Mvc;
using Amazon.CognitoIdentityProvider;
using Amazon.CognitoIdentityProvider.Model;
using System.ComponentModel.DataAnnotations;

namespace YourProject.Controllers
{
    [ApiController]
    [Route("api/[controller]")]
    public class AuthController : ControllerBase
    {
        private readonly IAmazonCognitoIdentityProvider _cognitoClient;
        private readonly string _clientId = "YOUR_APP_CLIENT_ID";

        public AuthController(IAmazonCognitoIdentityProvider cognitoClient)
        {
            _cognitoClient = cognitoClient;
        }

        #region SIGN UP FLOW

        /// <summary>
        /// Registers a new user with an email and password.
        /// </summary>
        /// <response code="200">User registered successfully; verification code sent.</response>
        /// <response code="400">Invalid registration details or user already exists.</response>
        [HttpPost("signup")]
        [ProducesResponseType(StatusCodes.Status200OK)]
        [ProducesResponseType(StatusCodes.Status400BadRequest)]
        public async Task<IActionResult> SignUp([FromBody] SignUpDto model)
        {
            try
            {
                var signUpRequest = new SignUpRequest
                {
                    ClientId = _clientId,
                    Username = model.Email, // Email behaves as the username
                    Password = model.Password,
                    UserAttributes = new List<AttributeType>
                    {
                        new AttributeType { Name = "email", Value = model.Email }
                    }
                };

                var response = await _cognitoClient.SignUpAsync(signUpRequest);

                return Ok(new {
                    Message = "Registration successful. Please check your email for the verification code.",
                    UserSub = response.UserSub
                });
            }
            catch (AmazonCognitoIdentityProviderException ex)
            {
                return BadRequest(new { Error = ex.Message });
            }
        }

        /// <summary>
        /// Confirms user registration using the emailed verification code.
        /// </summary>
        /// <response code="200">Account confirmed successfully.</response>
        /// <response code="400">Invalid code or confirmation expired.</response>
        [HttpPost("confirm-signup")]
        [ProducesResponseType(StatusCodes.Status200OK)]
        [ProducesResponseType(StatusCodes.Status400BadRequest)]
        public async Task<IActionResult> ConfirmSignUp([FromBody] ConfirmSignUpDto model)
        {
            try
            {
                var confirmRequest = new ConfirmSignUpRequest
                {
                    ClientId = _clientId,
                    Username = model.Email,
                    ConfirmationCode = model.VerificationCode
                };

                await _cognitoClient.ConfirmSignUpAsync(confirmRequest);

                return Ok(new { Message = "Account successfully confirmed. You can now log in." });
            }
            catch (AmazonCognitoIdentityProviderException ex)
            {
                return BadRequest(new { Error = ex.Message });
            }
        }

        #endregion

        #region LOGIN FLOW

        /// <summary>
        /// Initiates the login sequence using email credentials.
        /// </summary>
        /// <response code="200">Returns authorization tokens OR security challenge details.</response>
        /// <response code="401">Invalid credentials provided.</response>
        [HttpPost("login")]
        [ProducesResponseType(StatusCodes.Status200OK)]
        [ProducesResponseType(StatusCodes.Status401Unauthorized)]
        public async Task<IActionResult> InitiateLogin([FromBody] LoginDto model)
        {
            try
            {
                var authRequest = new InitiateAuthRequest
                {
                    ClientId = _clientId,
                    AuthFlow = AuthFlowType.USER_PASSWORD_AUTH,
                    AuthParameters = new Dictionary<string, string>
                    {
                        { "USERNAME", model.Email },
                        { "PASSWORD", model.Password }
                    }
                };

                var response = await _cognitoClient.InitiateAuthAsync(authRequest);

                // If Cognito requires MFA or another verification step
                if (response.ChallengeName != null)
                {
                    return Ok(new
                    {
                        RequiresChallenge = true,
                        ChallengeName = response.ChallengeName.Value,
                        Session = response.Session, // Must be passed back to the front-end to track state
                        Email = model.Email
                    });
                }

                // If account does not require challenges, pass tokens directly
                return Ok(new
                {
                    RequiresChallenge = false,
                    Tokens = new
                    {
                        IdToken = response.AuthenticationResult.IdToken,
                        AccessToken = response.AuthenticationResult.AccessToken,
                        RefreshToken = response.AuthenticationResult.RefreshToken
                    }
                });
            }
            catch (NotAuthorizedException ex)
            {
                return Unauthorized(new { Error = "Invalid username or password.", Details = ex.Message });
            }
            catch (AmazonCognitoIdentityProviderException ex)
            {
                return BadRequest(new { Error = ex.Message });
            }
        }

        /// <summary>
        /// Submits answers to security challenges issued during login (e.g., Email OTP/MFA).
        /// </summary>
        /// <response code="200">Challenge verified; access tokens issued.</response>
        /// <response code="400">Verification response failed or session expired.</response>
        [HttpPost("verify-challenge")]
        [ProducesResponseType(StatusCodes.Status200OK)]
        [ProducesResponseType(StatusCodes.Status400BadRequest)]
        public async Task<IActionResult> VerifyChallenge([FromBody] VerifyChallengeDto model)
        {
            try
            {
                var challengeRequest = new RespondToAuthChallengeRequest
                {
                    ClientId = _clientId,
                    ChallengeName = model.ChallengeName,
                    Session = model.Session, // The exact session string sent back from the login API
                    ChallengeResponses = new Dictionary<string, string>
                    {
                        { "USERNAME", model.Email },
                        { "ANSWER", model.ChallengeAnswer }
                    }
                };

                var response = await _cognitoClient.RespondToAuthChallengeAsync(challengeRequest);

                // Nested check if Cognito requires another challenge sequence (Chained challenges)
                if (response.ChallengeName != null)
                {
                    return Ok(new
                    {
                        RequiresChallenge = true,
                        ChallengeName = response.ChallengeName.Value,
                        Session = response.Session
                    });
                }

                return Ok(new
                {
                    RequiresChallenge = false,
                    Tokens = new
                    {
                        IdToken = response.AuthenticationResult.IdToken,
                        AccessToken = response.AuthenticationResult.AccessToken,
                        RefreshToken = response.AuthenticationResult.RefreshToken
                    }
                });
            }
            catch (AmazonCognitoIdentityProviderException ex)
            {
                return BadRequest(new { Error = ex.Message });
            }
        }

        #endregion
    }

    #region DATA TRANSFER OBJECTS (DTOs)

    public class SignUpDto
    {
        [Required, EmailAddress] public string Email { get; set; } = string.Empty;
        [Required, MinLength(6)] public string Password { get; set; } = string.Empty;
    }

    public class ConfirmSignUpDto
    {
        [Required, EmailAddress] public string Email { get; set; } = string.Empty;
        [Required] public string VerificationCode { get; set; } = string.Empty;
    }

    public class LoginDto
    {
        [Required, EmailAddress] public string Email { get; set; } = string.Empty;
        [Required] public string Password { get; set; } = string.Empty;
    }

    public class VerifyChallengeDto
    {
        [Required, EmailAddress] public string Email { get; set; } = string.Empty;
        [Required] public string ChallengeName { get; set; } = string.Empty;
        [Required] public string Session { get; set; } = string.Empty;
        [Required] public string ChallengeAnswer { get; set; } = string.Empty;
    }

    #endregion
}
Step 3. Enable Passwordless SMS OTP Sign-In at the User Pool Level
Amazon Cognito recently introduced the USER_AUTH authentication flow, which enables choice-based sign-in.
What is Choice-Based Sign-In?
Choice-based sign-in allows users to choose their preferred authentication method during login instead of being restricted to a single sign-in experience.
Currently, Cognito supports the following sign-in options:
- Password
- Email OTP
- SMS OTP
- Passkey
Good to Know
USER_AUTHis the only authentication flow that supports choice-based sign-in.- Additional sign-in options such as SMS OTP, Email OTP, and Passkeys must be enabled at the User Pool level before they can be used.
- Because Phone number was selected as the sign-in identifier during User Pool creation, it automatically becomes a required user attribute.
Enable SMS OTP Sign-In
Navigate to Authentication methods → Sign-in options.
Edit Options for choice-based sign-in.
Select SMS message one-time password.
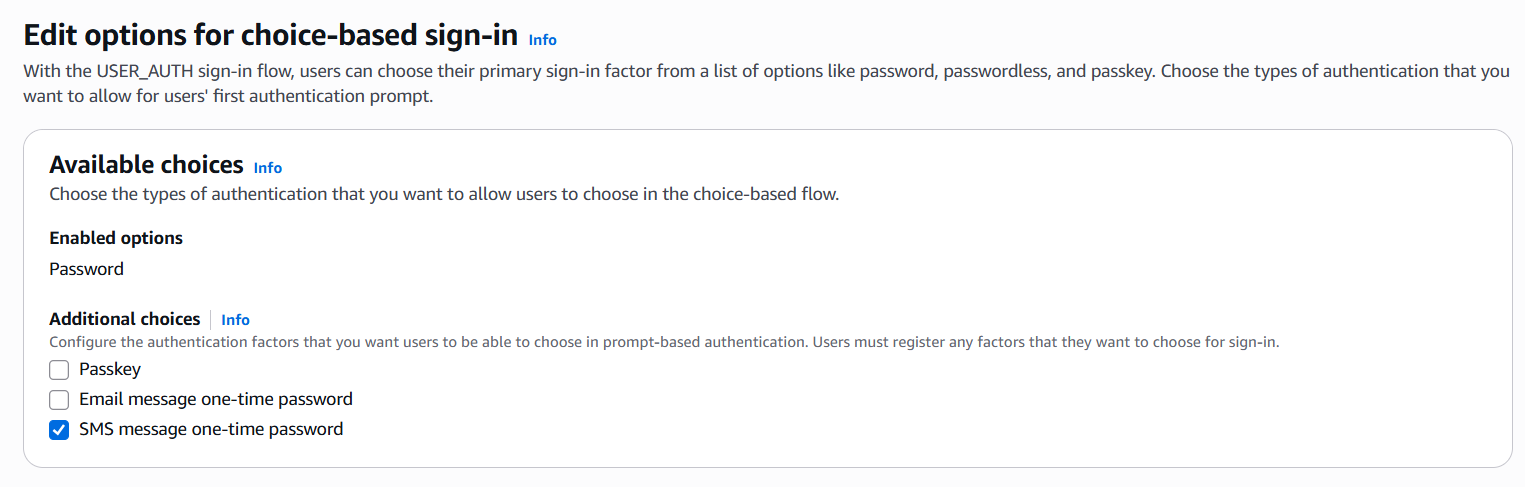
Save the changes.
Step 4. Enable the USER_AUTH Flow for the App Client
In the previous step, we enabled SMS OTP as a sign-in option at the User Pool level. Now we must allow the App Client to use the USER_AUTH authentication flow, which powers choice-based sign-in.
Navigate to App clients and select your App Client.
Click Edit.
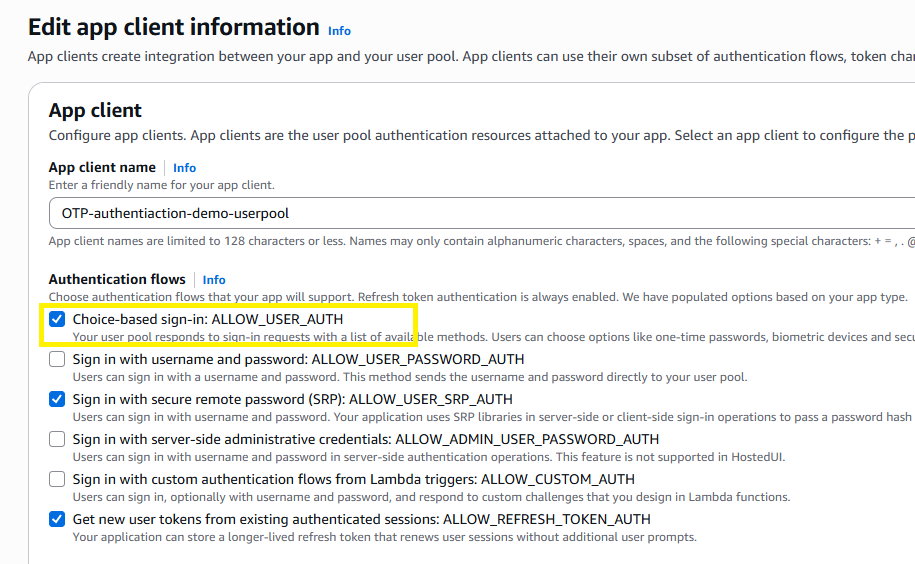
Under Authentication flows, enable Choice-based sign-in (
ALLOW_USER_AUTH).Save the changes.
Step 5. Disable Cognito-Assisted Verification During Sign-Up
By default, Cognito can verify a user's phone number or email address during registration by sending a verification code immediately after sign-up.
For a passwordless authentication experience, this extra verification step is unnecessary because the user's phone number will be verified during their first SMS OTP login.
Disable Sign-Up Verification
- Navigate to Sign-up → Attribute verification and user account confirmation.
- Click Edit.
- Under Cognito-assisted verification and confirmation, select Don't automatically send messages.
- Save the changes.
💡 Why We're Doing This
Shift verification completely to the login flow. Instead of validating contact attributes immediately during registration, you will simply create the user account in an unconfirmed or passwordless-ready state. The verification of the user's identity (via Email/SMS OTP or Passkey) will now happen dynamically during their very first login prompt.
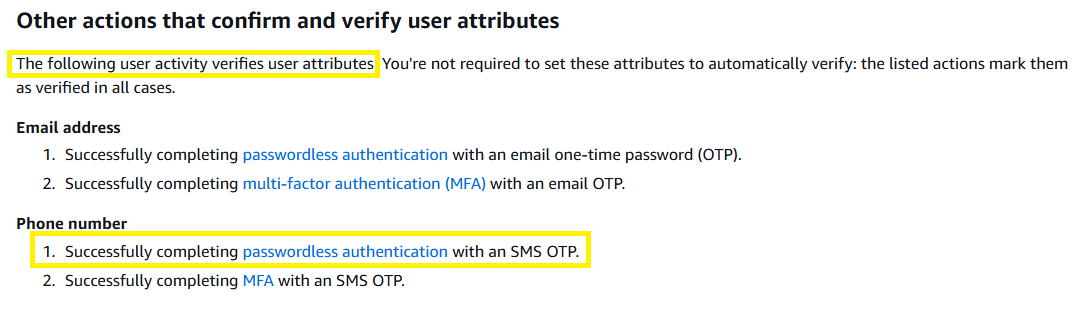
By disabling sign-up verification, we allow users to register instantly; Cognito will then naturally verify their contact attributes during their very first passwordless login prompt. This eliminates redundant registration codes and lets you transition the user straight into the login flow immediately after account creation.
The following screenshot from the Cognito documentation illustrates this behavior:
Step 6. Recap the Configuration and Execute the Login Flow
⚠️ Important: Sign-in options such as SMS OTP, Email OTP, and Passkeys must first be enabled at the User Pool level before they can be used.
At this point, we have completed the required configuration:
- Enabled SMS OTP as a sign-in option at the User Pool level.
- Enabled the
USER_AUTHauthentication flow (ALLOW_USER_AUTH) on the App Client. - Disabled Cognito-assisted verification during sign-up.
With this configuration in place, the login flow works as follows:
- Call
InitiateAuthwithUSER_AUTHas the authentication flow. - Optionally provide
PREFERRED_CHALLENGE(for example,SMS_OTPorEMAIL_OTP) to directly trigger a specific sign-in method. - If no preferred challenge is provided, Cognito returns a
SELECT_CHALLENGEchallenge along with the available sign-in options. - The user selects a sign-in method (or receives the OTP if a preferred challenge was specified).
- Complete the authentication flow by calling
RespondToAuthChallenge. - Once the challenge is successfully verified, Cognito returns the authentication tokens.
Example Response: SELECT_CHALLENGE
{
    "ChallengeName": "SELECT_CHALLENGE",
    "AvailableChallenges": [
        "PASSWORD_SRP",
        "PASSWORD",
        "EMAIL_OTP",
        "SMS_OTP"
    ],
    "ChallengeParameters": {
        "USERNAME": "user@example.com"
    },
    "Session": "AYABeC1-y8qooiuysEv0uM4wAqQAHQ..."
}
Step 7. Add Your Phone Number to the SNS SMS Sandbox
By default, new AWS accounts are placed in the SNS SMS Sandbox to prevent unauthorized SMS usage. While your account remains in the sandbox, SMS messages can only be sent to verified phone numbers.
To test the passwordless SMS OTP flow, you must first verify the phone number that will receive the OTPs.
- Open the Amazon SNS Console in a Region that supports SMS messaging.
- Navigate to Text messaging (SMS) under the Mobile section.
- In the Sandbox destination phone numbers section, click Add phone number.
- Enter your phone number in E.164 format (for example,
+1234567890). - Click Add phone number.
- AWS sends a verification OTP to the specified number.
- Enter the received OTP and click Verify phone number.
Once the phone number is verified, Cognito can successfully deliver SMS OTPs to that device.
Note: If your AWS account has already been moved out of the SMS Sandbox, this step is not required.
Step 8. Implement the Passwordless SMS Authentication Flow
Now that Cognito is fully configured, let's implement the passwordless SMS authentication flow using the AWS SDK.
At a high level, the implementation consists of three API operations:
- Sign Up – Register a user with their phone number.
- Login – Initiate the
USER_AUTHflow and request an SMS OTP. - Verify Login – Validate the OTP and retrieve the authentication tokens.
1. Create a New Project
Create a new ASP.NET Core Web API project:
dotnet new webapi -o CognitoPasswordlessSmsApi --use-controllers
cd CognitoPasswordlessSmsApi
2. Install the Required Packages
Install the AWS SDK packages required to communicate with Amazon Cognito:
dotnet add package AWSSDK.CognitoIdentityProvider
dotnet add package AWSSDK.Extensions.NETCore.Setup
dotnet add package Swashbuckle.AspNetCore
3. Register AWS Services in Dependency Injection (DI)
Open your Program.cs file. Register IAmazonCognitoIdentityProvider in the dependency injection container:
using Amazon.CognitoIdentityProvider;

var builder = WebApplication.CreateBuilder(args);

// Add services to the container.
builder.Services.AddControllers();
builder.Services.AddEndpointsApiExplorer();
builder.Services.AddSwaggerGen();

// Register the AWS Cognito Identity Provider Client into the DI container
builder.Services.AddAWSService<IAmazonCognitoIdentityProvider>();

var app = builder.Build();

if (app.Environment.IsDevelopment())
{
    app.UseSwagger();
    app.UseSwaggerUI();
}

app.UseHttpsRedirection();
app.UseAuthorization();
app.MapControllers();

app.Run();
4. Create the Data Transfer Objects (DTOs)
Create a Models folder and add the following DTOs:
using System.ComponentModel.DataAnnotations;

namespace CognitoPasswordlessSmsApi.Models
{
    public class SignUpRequestDto
    {
        [Required, Phone]
        public string PhoneNumber { get; set; } = string.Empty; // Format: +1234567890
    }

    public class InitiateLoginDto
    {
        [Required, Phone]
        public string PhoneNumber { get; set; } = string.Empty;
    }

    public class VerifySmsChallengeDto
    {
        [Required, Phone]
        public string PhoneNumber { get; set; } = string.Empty;
        [Required]
        public string Session { get; set; } = string.Empty;
        [Required]
        public string OtpCode { get; set; } = string.Empty;
    }
}
5. Implement the Authentication Endpoints
Create an AuthController and inject IAmazonCognitoIdentityProvider through the constructor.
using Microsoft.AspNetCore.Mvc;
using Amazon.CognitoIdentityProvider;

namespace CognitoPasswordlessSmsApi.Controllers
{
    [ApiController]
    [Route("api/[controller]")]
    public class AuthController : ControllerBase
    {
        private readonly IAmazonCognitoIdentityProvider _cognitoClient;
        private readonly string _clientId = "YOUR_AWS_COGNITO_APP_CLIENT_ID";

        public AuthController(IAmazonCognitoIdentityProvider cognitoClient)
        {
            _cognitoClient = cognitoClient;
        }
    }
}
6. Add the Passwordless Registration (Sign-Up) Action
Add the following sign-up action to register users with their phone number. Because sign-up verification was disabled earlier, users can proceed directly to the passwordless login flow.
using Amazon.CognitoIdentityProvider.Model;
using CognitoPasswordlessSmsApi.Models;

// Append this action method inside your AuthController class:

/// <summary>
/// Registers a user using only their phone number without executing explicit sign-up confirmation.
/// </summary>
[HttpPost("signup")]
[ProducesResponseType(StatusCodes.Status200OK)]
[ProducesResponseType(StatusCodes.Status400BadRequest)]
public async Task<IActionResult> SignUp([FromBody] SignUpRequestDto model)
{
    try
    {
        var signUpRequest = new SignUpRequest
        {
            ClientId = _clientId,
            Username = model.PhoneNumber, // Phone number serves as the primary username identifier
            Password = Guid.NewGuid().ToString("N") + "1!Aa", // A random placeholder password satisfies basic signup logic
            UserAttributes = new List<AttributeType>
            {
                new AttributeType { Name = "phone_number", Value = model.PhoneNumber }
            }
        };

        var response = await _cognitoClient.SignUpAsync(signUpRequest);

        return Ok(new
        {
            Message = "User registered successfully. You can proceed directly to login.",
            UserSub = response.UserSub
        });
    }
    catch (AmazonCognitoIdentityProviderException ex)
    {
        return BadRequest(new { Error = ex.Message });
    }
}
7. Add the Passwordless Login Actions (Initiate & Verify)
Finally, add the two login actions to complete the authentication sequence. The first action triggers the choice-based USER_AUTH pipeline to send the SMS OTP, and the second action validates the incoming code against the cryptographic session token.
// Append these two action methods inside your AuthController class:

/// <summary>
/// Initiates the login flow using the USER_AUTH choice-based pipeline.
/// </summary>
[HttpPost("login")]
[ProducesResponseType(StatusCodes.Status200OK)]
[ProducesResponseType(StatusCodes.Status400BadRequest)]
public async Task<IActionResult> InitiateLogin([FromBody] InitiateLoginDto model)
{
    try
    {
        var authRequest = new InitiateAuthRequest
        {
            ClientId = _clientId,
            AuthFlow = AuthFlowType.USER_AUTH, // Crucial: Leverages the choice-based engine
            AuthParameters = new Dictionary<string, string>
            {
                { "USERNAME", model.PhoneNumber },
                { "PREFERRED_CHALLENGE", "SMS_OTP" } // Directly forces Cognito to issue an SMS OTP
            }
        };

        var response = await _cognitoClient.InitiateAuthAsync(authRequest);

        // For the passwordless SMS flow, Cognito directly returns an SMS_OTP challenge name
        return Ok(new
        {
            ChallengeName = response.ChallengeName?.Value,
            Session = response.Session, // Must be passed to verify-login to maintain connection state
            Message = "An OTP code has been dispatched to your registered phone number."
        });
    }
    catch (AmazonCognitoIdentityProviderException ex)
    {
        return BadRequest(new { Error = ex.Message });
    }
}

/// <summary>
/// Verifies the incoming SMS OTP code against the tracking session state.
/// </summary>
[HttpPost("verify-login")]
[ProducesResponseType(StatusCodes.Status200OK)]
[ProducesResponseType(StatusCodes.Status400BadRequest)]
public async Task<IActionResult> VerifyLogin([FromBody] VerifySmsChallengeDto model)
{
    try
    {
        var challengeRequest = new RespondToAuthChallengeRequest
        {
            ClientId = _clientId,
            ChallengeName = ChallengeNameType.SMS_OTP,
            Session = model.Session, // Passes forward the active tracking session token
            ChallengeResponses = new Dictionary<string, string>
            {
                { "USERNAME", model.PhoneNumber },
                { "SMS_OTP_CODE", model.OtpCode } // The numeric verification code typed by the user
            }
        };

        var response = await _cognitoClient.RespondToAuthChallengeAsync(challengeRequest);

        // Authentication succeeded. User attributes are automatically verified here.
        return Ok(new
        {
            Message = "Authentication verified successfully.",
            Tokens = new
            {
                IdToken = response.AuthenticationResult.IdToken,
                AccessToken = response.AuthenticationResult.AccessToken,
                RefreshToken = response.AuthenticationResult.RefreshToken
            }
        });
    }
    catch (AmazonCognitoIdentityProviderException ex)
    {
        return BadRequest(new { Error = ex.Message });
    }
}
Step 9. Build, Run, and Test the API
Run the following command in your project root to launch the application:
dotnet run
Open your browser and navigate to https://localhost:<YOUR_PORT>/swagger to test the endpoints in sequence:
1. Register the User
Endpoint:
POST /api/auth/signupPayload:
{
  "phoneNumber": "+1234567890"
}
Result: Status
200 OK. The account is created instantly without sending registration codes.
2. Request an OTP Code
Endpoint:
POST /api/auth/loginPayload:
{
  "phoneNumber": "+1234567890"
}
Result: Status
200 OK. An OTP code is sent to the device. Copy thesessionstring from the response payload.
3. Verify and Collect Tokens
Endpoint:
POST /api/auth/verify-loginPayload:
{
  "phoneNumber": "+1234567890",
  "session": "PASTE_THE_SESSION_STRING_HERE",
  "otpCode": "123456"
}
Result: Status
200 OK. Cognito verifies the user and returns theIdToken,AccessToken, andRefreshToken.
Conclusion
Amazon Cognito makes it surprisingly straightforward to implement passwordless SMS authentication without building your own OTP infrastructure. By combining choice-based sign-in with the USER_AUTH flow, you can deliver a modern login experience while letting Cognito handle OTP delivery, verification, and token issuance.
The complete source code used in this guide is available on GitHub at ankushjain358/cognito-passwordless-sms-dotnet. Feel free to fork the repository and use it as a starting point for your own projects.